Tag: llm

  • MCP Servers, Explained in 8 Steps

    Hey folks, Abhi here!

    Quick one today — let’s demystify “MCP Server” with a simple example, because I keep seeing people throw the term around without explaining what actually happens under the hood.

    The example

    Say you type this into Claude:

    “Show me open cases for Acme”

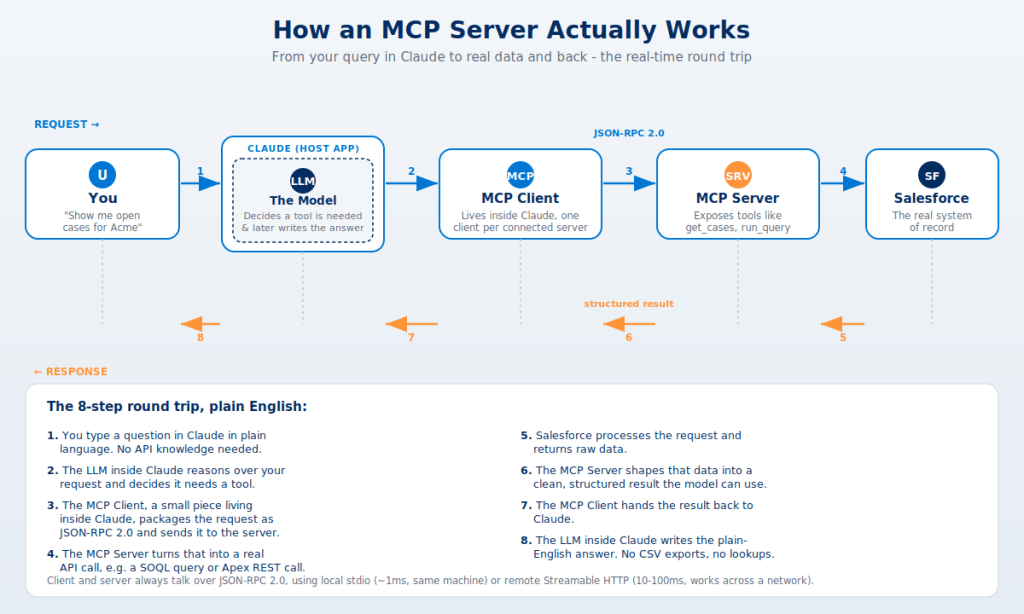
    Claude doesn’t have your Salesforce data memorized. So here’s what happens in real time, step by step:

    1. You ask the question in plain English.
    2. The LLM inside Claude reads it and realizes — “I need a tool for this, I can’t answer from memory.”
    3. Claude’s MCP Client (a small piece living inside the app) packages that need into a JSON-RPC 2.0 message and sends it to the right MCP Server.
    4. The MCP Server turns that generic request into something Salesforce understands — think a SOQL query or an Apex REST call.
    5. Salesforce runs it and returns raw data.
    6. The MCP Server shapes that raw data into a clean, structured result.
    7. It travels back through the MCP Client, into Claude.
    8. The LLM writes the plain-English answer you see on screen — no CSV export, no manual lookup.

    Why this matters for admins

    That whole 8-step round trip happens in a second or two, every single time. The MCP Server is the translator — it’s the only piece that actually knows how to talk to Salesforce. The MCP Client is just a router. The LLM is the only part actually “thinking” — deciding a tool is needed, and later turning the result into words.

    This is the exact plumbing sitting under every “AI agent talks to Salesforce” demo you’ve seen lately, including Agentforce. If you’re evaluating a third-party MCP server for your org, this is also where you should be asking security questions — who built the server, what does it have access to, and how is that JSON-RPC channel authenticated.

    That’s it — MCP in one example. I’m diving into Headless 360 next, so more on that soon. Catch you in the next one!

  • Stop Describing Your Whole Org to Find One Object: getGlobalDescribe() vs describeSObjects() vs Type.forName()

    Hey folks, Abhi here!

    Quick question to start: how many times have you written this line without thinking twice?

    apex

    Schema.SObjectType t = Schema.getGlobalDescribe().get(objectName);

    Be honest. It’s muscle memory at this point. It works, your tests pass, you move on with your life. But here’s the thing — that one harmless-looking line is often the most expensive way to do the thing you actually wanted to do. And if your code is heading anywhere near an AppExchange security review, one of these patterns will get you flagged.

    So let’s break down the three usual suspects for resolving and describing an SObject dynamically — what each one actually costs, when to reach for it, and when to keep your hand in your pocket. No fluff, just the stuff that’ll make your Apex leaner and your security reviewer happier.

    The contenders, at a glance

    Before we dig in, here’s the lineup:

    • Schema.getGlobalDescribe() — hands you a Map<String, SObjectType> of every object in the org. Describes everything. Doesn’t resolve Apex classes.
    • Schema.describeSObjects(List<String>) — describes only the names you pass in. Scoped to exactly what you asked for. Doesn’t resolve Apex classes.
    • Type.forName(name) — returns a System.Type you can call newInstance() on. A single type lookup. And yes — it resolves Apex class names too. (Hold that thought.)
    • The forgotten one: Account.SObjectType — the static token. Zero lookup cost, resolved at compile time. Most people forget it exists.

    Now let’s actually use them.

    1. getGlobalDescribe() — the sledgehammer

    getGlobalDescribe() builds a map of all objects in your org. Standard, custom, and every single object dragged in by every managed package you’ve ever installed.

    apex

    // You wanted ONE object. You just described thousands.
    SObjectType t = Schema.getGlobalDescribe().get('Account');

    Here’s the problem: the cost scales with the size of your org, not with your need. In a clean dev org, this feels free — you’ll never notice it. But take that same line into a mature enterprise org running 30 managed packages, and that map can hold thousands of entries. That’s real CPU time to build it and real heap to hold it.

    Now, to be fair — describes are cached per transaction, so it’s the first call that’s expensive, not every call. But you’ve still paid for describing thousands of objects you’re never going to touch. That’s the part that stings.

    Use it when: you genuinely need to enumerate or iterate every object — a metadata explorer, a generic admin tool, a “list all objects” picker. When “everything” is literally what you need, this is the right tool.

    Don’t use it when: you already know the object’s name. Which, let’s be real, is the 95% case.

    2. describeSObjects() — the scalpel

    apex

    SObjectType t = Schema.describeSObjects(
    new List<String>{ 'Account' }
    )[0].getSObjectType();

    This describes only the objects you name. One object, one describe. Need a handful? Pass them all in one call:

    apex

    List<DescribeSObjectResult> results = Schema.describeSObjects(
    new List<String>{ 'Account', 'Contact', 'Opportunity' }
    );

    The cost here is proportional to what you actually asked for — independent of how bloated your org is. That’s the whole point.

    One gotcha: it throws if you pass an invalid name. So when the input comes from a user, config, or a payload, wrap it:

    apex

    private static SObjectType resolveSObjectType(String objectName) {
    if (String.isBlank(objectName)) {
    throw new AuraHandledException('Object name is required.');
    }
    try {
    return Schema.describeSObjects(
    new List<String>{ objectName }
    )[0].getSObjectType();
    } catch (Exception e) {
    throw new AuraHandledException(
    'Object "' + objectName + '" not found or not accessible.'
    );
    }
    }

    Bonus tip — lazy loading: there’s an overload, describeSObjects(types, SObjectDescribeOptions.DEFERRED), that defers loading the expensive child-relationship metadata until you actually ask for it. If you only need field info and not relationships, this trims the cost even further. Most people don’t know it’s there.

    Use it when: the object name is dynamic — from config, a payload, a UI input — and you only want that object’s metadata. Honestly, this should be your default for dynamic describe.

    3. Type.forName() — the wrong tool for SObjects (usually)

    You can resolve an SObject type this way:

    apex

    SObjectType t = ((SObject) Type.forName('Account').newInstance()).getSObjectType();

    But look closely at what just happened: you instantiated an object just to ask it what type it is. That’s already weird. But it gets worse, because Type.forName doesn’t only resolve SObjects — it resolves Apex class names too. Feed it user-controlled input and .newInstance() will happily run the no-arg constructor of whatever class matches that string.

    That’s two problems stacked on top of each other:

    • Performance: you built an instance you never needed.
    • Security: instantiating arbitrary types from user-controlled input is exactly the pattern an AppExchange security reviewer flags. And relying on the (SObject) cast to fail afterward? Too late — the constructor already ran.

    So when should you use it? When you’re doing genuine dynamic Apex — a factory pattern, custom-metadata-driven dispatch, plugin architecture. Stuff where instantiating a class by name is the actual goal:

    apex

    // Legitimate use: build a handler chosen by config — not an SObject lookup
    MyInterface handler = (MyInterface) Type.forName(config.ApexClassName__c).newInstance();

    Don’t use it when: you just want an SObjectType or a describe. Use describeSObjects instead — it physically can’t be tricked into running a constructor.

    The one everyone forgets: the static token

    Here’s the kicker. If you know the object at compile time, you don’t need to describe anything at all:

    apex

    SObjectType t = Account.SObjectType; // free
    DescribeSObjectResult d = Account.SObjectType.getDescribe();

    Zero lookup cost. Whenever the object is hard-coded, reach for this first. No map, no list, no instantiation. It’s the cleanest option and it’s sitting right there.

    A quick word on governor limits

    You might be thinking, “Abhi, describes don’t even count against my SOQL limit, so who cares?” Fair point — describe calls don’t consume SOQL queries, and modern API versions removed the old hard cap on the number of describes you can run.

    But “no hard limit” doesn’t mean “free.” The real ceilings here are CPU time and heap size — and that’s precisely where getGlobalDescribe() quietly eats your transaction alive in a big org. And remember, describes are cached per transaction, so the cost is front-loaded on first access, not spread out per call. Plan accordingly.

    TL;DR — which one, when

    • Object known at compile timeAccount.SObjectType
    • Dynamic name, need one (or a few) objectsSchema.describeSObjects(List<String>)
    • You truly need to iterate every objectSchema.getGlobalDescribe()
    • Instantiating an Apex class by nameType.forName(...).newInstance()
    • Resolving an SObject type from user inputnot Type.forName — use describeSObjects

    The rule of thumb is simple: describe exactly what you need, no more. Reach for getGlobalDescribe() only when “everything” is what you need, and keep Type.forName for dynamic class loading — never as a backdoor SObject resolver, especially in code headed for security review.

    So next time your fingers start typing getGlobalDescribe().get(...) out of habit — pause. Ask yourself: do I actually need the whole org? Most of the time, the answer’s no. And swapping that one line for describeSObjects cuts the per-call cost, sidesteps the Type.forName security smell, and sails a lot cleaner through any AppExchange-readiness checklist. Same line of code, massively better behavior.

    Catch you in the next one!

  • Salesforce Summer ’26 for Developers: The Technical Deep Dive

    Hey devs, Abhi back again!

    After my admin-focused Summer ’26 post, a bunch of you reached out asking, “Bro, what about us developers?” Fair point. So here’s the technical companion — all the Apex, LWC, and platform changes that are going to land in your code review queue over the next few weeks.

    Quick heads up: this release has the most impactful Apex security change in years. If you’re upgrading code to API version 67.0, you genuinely need to read the first section carefully. Let’s get into it.

    🚨 The Big One: API Version 67.0 and Apex User Mode

    This is the change everyone’s talking about, and rightly so. Salesforce is finally moving Apex toward secure-by-default behavior. Here’s what shifts when you compile a class at API version 67.0 or later:

    1. Database Operations Run in User Mode by Default

    Previously, SOQL, SOSL, DML, and Database methods ran in system mode — meaning they ignored object permissions, field-level security (FLS), and sharing rules. In v67, the same code now runs in user mode by default.

    So this query:

    apex

    List<Account> accounts = [SELECT Id, Name, Sensitive_Field__c FROM Account];

    In v66 → runs in system mode, returns everything regardless of user permissions. In v67 → runs in user mode, respects the running user’s FLS, object permissions, and sharing rules.

    This is a massive shift. If your code expects to see records or fields the running user doesn’t have access to, those queries may return fewer rows — or throw an exception — where they previously worked fine.

    You can still explicitly opt into system mode when needed:

    apex

    List<Account> accounts = [SELECT Id, Name FROM Account WITH SYSTEM_MODE];

    Or for Database methods:

    apex

    Account acc = Database.query(
    'SELECT Id, Name FROM Account WHERE Rating = \'Hot\'',
    AccessLevel.SYSTEM_MODE
    );

    2. Classes Default to with sharing

    In API v66 and earlier, an Apex class without an explicit sharing declaration defaulted to without sharing (with some exceptions). From v67 onwards, the default is with sharing.

    apex

    // In v67+, this class enforces sharing rules by default
    public class AccountService {
    // No sharing declaration = with sharing now
    }

    My honest advice: always declare sharing explicitly. Don’t rely on defaults for security-critical code. It’s just better hygiene.

    3. WITH SECURITY_ENFORCED is Removed

    If your codebase still uses WITH SECURITY_ENFORCED, you need to replace it. Apex classes set to API v67.0+ that include this clause will not compile.

    Replace it with WITH USER_MODE:

    apex

    // Old (won't compile in v67+)
    SELECT Id, Name FROM Account WITH SECURITY_ENFORCED
    // New
    SELECT Id, Name FROM Account WITH USER_MODE

    WITH USER_MODE is actually better — it supports polymorphic fields and returns the full set of access errors, not just the first one.

    4. Triggers Always Run in System Mode

    Apex triggers now always run in system mode, regardless of API version. You can no longer declare explicit sharing or access modes on triggers. If you had logic depending on user-mode trigger behavior, move it into a handler class where you can control the context.

    What You Should Actually Do

    Old classes are unaffected unless you explicitly bump them to v67. So the danger isn’t automatic — it’s when you upgrade. Here’s my checklist:

    1. Audit your code for queries that rely on system-mode behavior. Service classes, utility libraries, and managed package code are usually the biggest offenders.
    2. Run your test classes with System.runAs() blocks. Without proper runAs, your tests probably don’t actually validate the user-mode boundary.
    3. Don’t bulk-upgrade everything to v67 on day one. Pick one class, test, deploy. Iterate.
    4. Plan for retirements too. Platform API versions 31.0 through 40.0 are deprecated and will fully retire in Summer ’28. If you have ancient integrations, now’s the time.

    Multiline Strings and String Templates in Apex

    Finally. Finally. This is the QoL upgrade I’ve been waiting years for.

    Multiline Strings

    Use triple single quotes to define a multiline string:

    apex

    String myPoem = '''
    Multiline strings are here, hooray!
    You can start using them today.
    Triple quote, then start a new line,
    For example this will work fine,
    Poetry is not my forte!
    ''';

    No more 'line one\n' + 'line two\n' + ... concatenation nightmares.

    String Templates

    Pair multiline strings with the new .template() method to do clean variable interpolation:

    apex

    String message = '''
    Hello ${firstName},
    Your order was dispatched on ${dispatchDate}.
    Thanks,
    The Team
    '''.template(new Map<String, Object>{
    'firstName' => 'Abhi',
    'dispatchDate' => Date.today()
    });

    Email bodies, JSON payloads, debug messages, HTTP request bodies, generated SOQL — everything that used to be a concatenation mess becomes readable.

    LWC State Management (Now GA)

    State Management for Lightning Web Components is officially GA in Summer ’26. If you’ve ever built two components on the same page that need to share state and ended up with a tangle of CustomEvent dispatches plus pubsub plus Lightning Message Service — this is for you.

    Picture an Opportunity page with two components: one listing line items with the ability to add new ones, and another showing the total amount. With State Management, both components can subscribe to a shared state store, and updates from one automatically reflect in the other — no event plumbing required.

    This is a fundamental architectural improvement for any team building complex multi-component pages.

    LWC Live Preview (GA)

    Previously called Lightning Preview, this is now Live Preview and it’s generally available. You can preview a single LWC in your browser or directly in Visual Studio Code without reloading the entire Lightning page.

    From the CLI:

    bash

    sf lightning dev component

    The CLI prompts you for whatever flags it needs. The preview tab updates automatically as you save changes. Single Component Live Preview supports Lightning Data Service wire adapters, @salesforce scoped modules, and Apex controllers.

    If you’ve ever waited 90 seconds for a Lightning page to reload just to verify a CSS tweak, this changes your life. I’m not exaggerating.

    Web Console (Beta) — The New Developer Console

    Salesforce is shipping a client-side IDE embedded directly in Salesforce. Think of it as the modern successor to the old Developer Console.

    What you can do in Web Console:

    • Build and run SOQL queries
    • Configure trace flags and debug log levels
    • Execute anonymous Apex
    • Build, debug, and deploy Apex
    • It opens automatically when you access Apex Classes, Apex Triggers, or Apex Jobs in Setup

    Enable it: Setup → Quick Find → “Development” → Web Console (Beta) → toggle on, then refresh.

    It’s not going to replace VS Code + Salesforce CLI for serious development, but it’s a great quick-fix tool and a much better learning surface for new developers who aren’t ready to set up a local toolchain.

    Release Manager Three-Channel System (Beta)

    This is a really thoughtful addition for teams that want to stay ahead of the release cycle. Salesforce introduced three channels:

    • Standard — The stable production release everyone’s on.
    • Accelerated — Production-ready features that haven’t been released in a major release yet.
    • Dev — New features in active development, often without full documentation.

    Features get promoted from Dev → Accelerated → Standard as they mature. Opting into the Dev channel is how you get access to things like:

    Dynamic Lists (Developer Preview)

    Two new components — lightning-dynamic-list-container and lightning-dynamic-list-item — that use virtualization to render large lists efficiently. Whether you’re displaying 50 or 5,000 items, the browser only renders what’s visible. No more pagination workarounds for big lists.

    To use, opt into the Dev channel in Salesforce Release Manager.

    LWC in Dashboards (GA)

    You can now embed custom Lightning Web Components directly as dashboard widgets. In dashboard edit mode, click +Widget and select Lightning Web Component, configure properties, and you’re done.

    This is huge for analytics use cases. Want a waterfall chart, custom drill-down behavior, or interactive filtering inline on a dashboard? Build it as an LWC and drop it in. No more separate Lightning pages.

    Apex Action Improvements for Flow

    For those building Apex actions to be consumed in Flow Builder, several InvocableActionExtension metadata enhancements just landed:

    • Custom property editors per input (not just for the entire action)
    • Picklists for action inputs — define valid values declaratively
    • Custom headers on the standard property editor
    • Metadata type assignments for inputs

    This is especially valuable for managed package developers. You can ship Flow actions with a guided, polished configuration UX that doesn’t require your customers to read documentation.

    You can also now provide custom styling hooks for your custom Flow Screen Components written in LWC — color, radius, weight, and other CSS attributes. Group them logically and customers get a tidy customization experience that matches their org’s branding.

    A Few Other Wins Worth Knowing

    • External Services support for enums — Include enums in OpenAPI specs and they appear as picklists in Flow Builder.
    • Hosted MCP Servers (GA) — Salesforce-hosted Model Context Protocol servers are now GA. Any MCP-compatible AI client can connect via OAuth.
    • Named Query API (GA) — Expose custom SOQL as scalable actions for REST API clients and AI agents.
    • Voice Toolkit API — Build voice-enabled LWC and Aura components for Service Cloud Voice.

    My Upgrade Strategy

    If I were running this in a real org, here’s how I’d sequence the work:

    1. Spin up a sandbox on the preview track and validate critical Apex against API v67.0.
    2. Identify high-risk classes — anything querying sensitive data, anything without explicit sharing declarations, anything using WITH SECURITY_ENFORCED.
    3. Don’t upgrade everything to v67 in one go. Bump non-critical classes first, test, then move to critical ones.
    4. Enable Web Console (Beta) in a sandbox — great for ad-hoc debugging.
    5. Try Live Preview in your local dev setup. It’ll change how you build LWCs.
    6. Refactor a multi-line string somewhere to feel the joy of triple-quotes.
    7. Evaluate State Management for any multi-component pages you maintain.

    Summer ’26 isn’t flashy on the developer side — but the Apex security changes alone make this one of the most consequential releases in the last few years. Plan the upgrade carefully, test thoroughly, and you’ll come out the other side with a more secure and maintainable codebase.

    What’s the change you’re most excited about? Or what’s the one that has you worried? Drop a comment — I’d love to hear what’s keeping you up at night with this release.

    Catch you in the next one!

    — Abhi